DIY Kayak Cart - Plywood, Hinges and HF wheels for Pelican Catch 130HD
I recently bought a Pelican Catch 130HD this fall after it went on sale for 20% off. It is a fairly heavy kayak and weighs about 80lbs. It is 12'6" LOA.
I wanted a cart to help move it around and saw some designs at a couple outdoor stores. One salesman said that being a fairly wide kayak, I should get a wider cart for it.
Most carts are designed so that a shallow V cradles the bottom of the boat. However most sit-on top kayaks are a catamaran design for improved lateral stability...
I decided to make my cart from plywood, a set of door hinges and some dolly wheels. I found a dolly wheel coupon on harbor freight for 10" wheels for $3.99USD. The cheapest I could find locally was $12 while looking at TSC, Cdn Tire, Princess Auto websites. I was headed to Niagara Falls NY anyways to pick up a replacement top for the boxster, so I stopped in at HF and got the wheels there...
First up was to make a template of the bottom of the kayak near the stern where the cart would sit. I used some boxboard from recycling, scissors and a stapler to come up with a pretty good representation of the bottom profile of my 'yak.
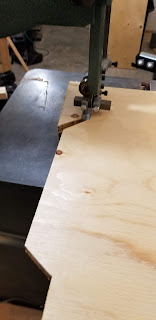
I had some plain Spruce plywood in my shop and found a piece that I could make the cart out of. Each piece of plywood was cut down to 21" by 14"on the tablesaw and would serve as the 2 sides of the V for the frame of the Kayak. I transfered the profile of the kayak to each piece of plywood and cut it out on the bandsaw.
Next a pair of door hinges were added to the plywood to form the bottom of the V. The idea of the cart is that it should fold up nicely for storage when not in use. I also cut a chunk of 2x4 and bored a 2.5" deep 5/8" hole into the 2x4. This would serve as the axles that would accept the HF wheels. The axles are 5/8" hardwood dowel secured into the blocks with glue. We'll see how she holds up.
A short piece of paracord held both pieces of plywood together so that they would form the V. It was test fit on the kayak.
The next day, I tried the cart on the kayak right side up, I ran into a couple problems. While the paracord held V shape and prevented the plywood from openning all the way up, when I had to lift to adjust the position of the kayak, the plywood sides would close shut. I would need to come up with a way to fix this. Also it became evident that I need a moveable footstand for it. While test fitting it, I could balance the stand somewhat on a 2x4 scrap, but it was only a beta solution. I used cinch straps to tighten down the car to the kayak. I also lined the top with a bit of carpet wrapped around the top edge of the plywood and held in with staples.
I overcame the problem of the V closing shut by attaching a piece of wood to the paracord to hold the V open. The 1st try was a brace of scrap wood with 2 slots cut in it to accept the paracord. However, after seeing this in application, it does make the brace a lot weaker as it is cut through 50% of the way in 2 spots. I had originally done this because I thought I would have to remove the brace to fold in the cart. But this was in fact not the case. I remade the brace with just 2 holes drilled in the center of the wood, and threaded the paracord through it.
I also added a stand that can swing out of the way. You notice that the cart can now sit up on it's own.
Kayak sitting up on cart. I added a few small holes near the top to accept a shorter cinch strap. I may use a hole saw and cut out some of the plywood to make it a bit lighter, but in reality, the plywood isn't the heavy part of the cart. The wheel assembly is the heaviest... Overall the kayak pulls rather nicely on it. It pulls over the paved driveway fine, as well as the bump at the lip of the driveway. It pulls on grass fine, as well as over small bumps.


0 Comments:
Post a Comment
Subscribe to Post Comments [Atom]
<< Home